Before proceed, in your local machine, Windows Powershell needs to be enabled to run scripts. Run the following command in an elevated Windows Powershell window (Run as administrator) to configure Powershell to allow scripts to run.
Set-ExecutionPolicy RemoteSigned
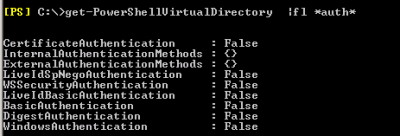
The PowerShell Virtual directory has no authentication settings configured by default. Run the following command with Exchange Management Shell in Exchange Server to get list of enabled authentications for Exchange Powershell
Get-PowerShellVirtualDirectory |fl *auth*
You can see no authentications is enabled for PowerShell virtual directory by default.
Run the following command with Exchange Management Shell in Exchange Server to enable Basic Authentication and this will allow us to use an SSL connection (HTTPS) to connect Exchange Powershell from computer.
Get-PowershellVirtualDirectory | Set-PowerShellVirtualDirectory -BasicAuthentication $true
TCP port 443 traffic needs to be open between your local computer and the Exchange server to use Basic Authentication.
– Copy the below powershell script and paste in Notepad file.
– Replace the parameter <FQDN of Exchange Server> with your own Exchange server name.
– Run the script in powershell to get Mailbox features from Remote Exchange server using Basic Authentication.
$cred = Get-Credential
$pso = new-pssessionoption -skipcacheck -SkipCNCheck -SkipRevocationCheck
$Session= New-PSSession -Configuration Microsoft.Exchange -ConnectionUri https://<FQDN of Exchange Server>/PowerShell/ -Credential $cred -Authentication Basic -Sessionoption $pso
Import-PSSession $Session
Get-CASMailBox

