Microsoft Azure by default set public IP assignment as Dynamic when you create a new VM until other than you specifically set it as Static. The dynamic IP address changes on every time when we restart the Azure VM. In this case, we need to download the new RDP file to connect to the virtual machine.
Summary
- Assign Static Public IP address to existing VM
- Assign Static Public IP address during the VM creation
Assign Static Public IP address to existing VM
Follow the below steps to set-up IP assignment as Static in an existing VM.
- Go to Azure AD portal.
- Click Virtual Machines, select the required virtual machine from the list.
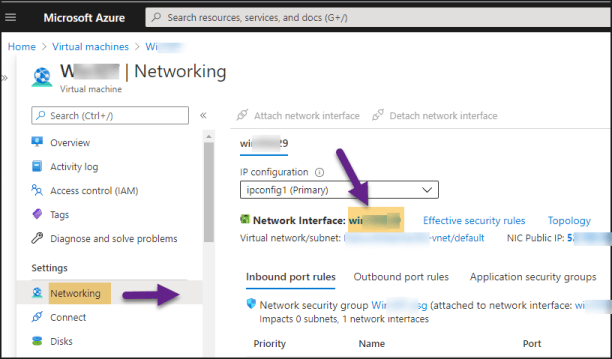
- On the left-hand side, under Settings, click Networking.
- Click on the link next to the Network interface. Refer to the below image.
- Under Settings, click IP Configurations, click on the IP configuration (ex: ipconfig1) to edit as shown in the below image.
- Under Public IP address settings, select (or keep) Associate.
- Under Public IP address, click Create new, set Assignment as Static, and click OK.
- Finally, click the Save button to save the changes.
You have now successfully assigned a static public IP address for your virtual machine which ensures that the address never changes.
Assign Static Public IP address during the VM creation
Static IP can also be assigned to an Azure VM during creation. When you create a VM, once the initial validation process completed, follow the below steps.
- Click on Networking tab.
- Under Network interface, next to Public IP, click Create new, set Assignment as Static, and click OK.
- Finally, click Review + Create to create the machine with static IP.
Advertisement


