In this post, I am going to share step by step guide on how to enable remote access for the website hosted in Azure VM (Virtual Machine) using IIS or any other web server.
By default, HTTP access from outside of VM will be blocked through the Inbound security rule which can be managed from the Azure portal. Also, we need to add a new Inbound Rule in Windows Firewall to allow the required port.
Summary
- Check web page from Azure VM local browser
- Add Inbound Rule in Network security group from Azure Portal
- Open port in Azure VM Firewall using Inbound Rule
- Check website access from a remote computer
Check web page from local browser and decide which port to open
Before proceeding, ensure that you can be able to browse your web page from Azure VM itself. For example, if your site runs on port 83, open the URL “http://localhost:83” in a web browser and check the page loads fine. If everything works fine, then we need to open port 83 in both the Azure Network security group and Firewall inbound rule.
Add Inbound Rule in Network security group from Azure Portal
Follow the below steps to allow the required port (ex: 83) for HTTP access in Azure Virtual Machine (VM).
- Go to Azure AD portal.
- Click Virtual Machines, select the required virtual machine from the list.
- On the left-hand side, under Settings, click Networking. Refer to the below image.
- Under Inbound port rules, click the Add inbound port rule button.
- For new inbound security role, keep Service as Custom, enter Destination port as 83, and select Protocol as TCP. Refer to the below image.
- Keep the Action as Allow and set a meaningful name for the rule (Ex: Port_83).
- Finally, click Add button to save the rule.
- The added role will be listed as shown in the below image.
Open port in Azure VM Firewall using Inbound Rule
Follow the below steps to open the required port in Firewall inside the Azure virtual machine.
- Click Start, type Windows Firewall or Windows Defender Firewall in the search box, and open the firewall page. If the Windows Defender is enabled, the firewall settings will be available as Windows Defender Firewall.
- Click on the Advanced settings link in the left-side navigation.
- Right-click on Inbound Rules -> Select New Rule.
- In New Inbound Rule Wizard, select Rule Type as Port and click Next. Refer to the below image.
- Set the Protocol as TCP, Specific local port as 83, and click Next.
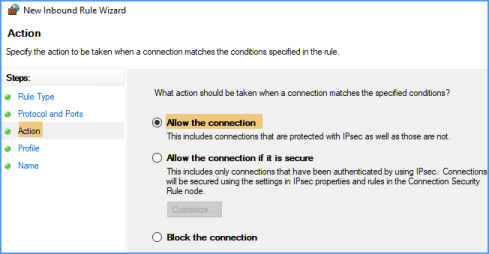
- Select Action as Allow the connection and click Next.
- Select all three profiles and click Next.
- Finally, provide a name for the rule (ex: Allow IID Port 83) and click the Finish button to save the rule.
Check website can be accessed from Remote Computer
Once you have added the inbound port rule for the required port by following the above steps, you can now access your web page from a remote machine. In the web page URL, you can just replace the localhost with your Azure machine’s Public IP address and browse from a remote machine (ex: your office or home PC).
If you have configured a DNS name for your Azure VM, then you can access the website with the DNS name.


